
Drill Press Spindle Sander: Fit, Capacity, and Setup Explained
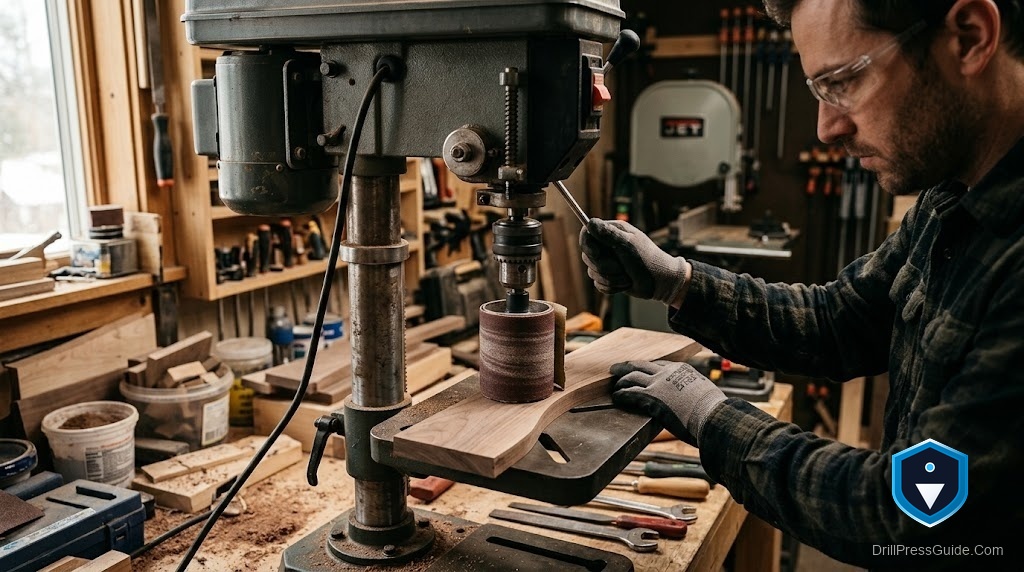
If you already own a drill press, you are closer to a working spindle sander than you think. Slide the right drum into the chuck, tighten it down, and that vertical machine you use for boring holes will happily smooth curves, clean up bandsaw marks, and knock the fuzz off tight inside profiles. I have done this for years on everything from small benchtop units to a floor-standing machine, and I want to walk you through what actually matters before you buy a drum kit and start sanding.
Here is the honest headline: a drill press makes a decent, occasional spindle sander, not a great dedicated one. If you understand that going in, you will be thrilled with the results. If you expect it to replace a true oscillating spindle sander, you will be disappointed. Let me explain why, and then point you to drums that genuinely fit.
What a Drill Press Spindle Sander Really Is
A spindle sander is nothing more than a rotating abrasive drum standing straight up off a flat surface. You press the edge of your workpiece against the spinning drum and follow the curve. A dedicated oscillating spindle sander adds an up-and-down motion so the abrasive wears evenly and you avoid burn rings.
Your drill press supplies the spinning part for free. The rotating chuck grips a sanding drum by its shank, the drum spins at the point of operation, and the work table underneath gives you a surface to guide against. What your drill press does not do is oscillate. That single missing feature is the whole story of the tradeoffs below.
Fit: Will the Drums Actually Grip?
This is where people get tripped up, so let me be blunt about it.
- Shank size. Most drum kits ride on a 1/4-inch steel shank, with smaller drums sometimes on a 1/8-inch shank. Nearly every keyed chuck on a home drill press closes down well past 1/4 inch, so you are fine. Check your chuck capacity anyway. If your machine has a tiny chuck, confirm it opens wide enough for the largest drum shank.
- Keyed chuck versus keyless. A keyed chuck (the kind you tighten with a chuck key) grips a smooth sanding shank harder than a keyless chuck does. Sanding puts steady side load on the drum, and a keyless chuck can let the shank creep loose. If you have a keyed chuck, use it and snug it firmly. If yours is keyless, check it often.
- The spindle taper does not matter here. You will see specs like MT2 spindle taper thrown around. That taper is how the chuck itself mounts to the quill, not how the drum mounts to the chuck. For sanding drums, ignore the taper and focus on the chuck jaws.
The takeaway: if your drill press has a standard keyed chuck, a 1/4-inch shank drum kit will fit. That covers the vast majority of kits sold.
Capacity: How Big a Workpiece Can You Handle?
Two machine numbers decide what you can sand comfortably.
- Swing. Swing is twice the distance from the spindle centerline to the column. It tells you how far a workpiece can reach before the column gets in the way. For sanding the edge of a board, swing rarely limits you, but it does matter on wide panels.
- Spindle travel. This is how far the quill drops when you pull the feed handle. On a spindle sander, more spindle travel is genuinely useful, because it lets you feed the drum down through the abrasive so you are not always sanding on the same worn band. Short spindle travel means the same strip of sandpaper contacts the wood every pass, and it loads up and burns faster.
Realistically, most benchtop and floor drill presses give you plenty of room for cabinet parts, toys, small furniture curves, and craft work. You will feel the limits on large panels, not on everyday pieces.
Setup: Getting a Clean, Safe Result
A few minutes of setup separate a scorched edge from a glassy one.
- Support the table. The stock work table has a hole in the center for the drill bit. That hole is the enemy of a spindle sander, because small parts dive into it and the drum has no backing beneath the wood. Make a simple auxiliary top: a piece of flat plywood or MDF clamped to the table with a hole cut just larger than your drum. Now the abrasive passes through the surface and the work is fully supported right at the point of operation.
- Pick a sane speed. Sanding likes moderate speed, not the screaming high end. If your machine has variable speed or a digital speed readout, set it to a middle setting. Too fast burns the wood and glazes the sleeve. On a stepped-pulley machine, a mid-range belt position is right.
- Set the depth stop thoughtfully. If your drill press has a depth stop, use it to control how far the quill drops so the drum stays where you want it against your auxiliary top. On machines with generous spindle travel, reposition the drum height between sessions so you use fresh abrasive.
- Move the work against rotation. Feed the workpiece into the drum so the rotation pushes against your feed direction. You keep control and get a cleaner cut.
- Skip the gimmicks. A laser guide and a work light are nice for drilling to a mark, but they do nothing for sanding a curve you are following by feel and eye. Do not pay extra for them if sanding is your goal.
The Real Pros and Cons
What you gain
- You already own the motor, the rotating chuck, and the table, so a drum kit is all you add.
- Drums swap in seconds and store in a drawer.
- For inside curves and small parts, it is genuinely capable.
What you give up
- No oscillation. This is the big one. Without up-and-down motion, the abrasive wears in a single band and can leave faint horizontal burn lines if you dwell. You manage it by keeping the work moving and repositioning the drum height.
- An induction motor on a drill press is built for intermittent boring, not continuous sanding runs. Give it breaks on long sessions.
- Dust goes everywhere. A drill press has no dust port under the table, so plan for a shop vac nozzle nearby.
Choosing a Drum Kit: My Recommendations
You want a kit with a range of drum diameters, a mix of grits, and sleeves you can actually find replacements for. Here are options I can point you to with confidence.
- For a simple, no-drama starter set, the DCT Drill Press Sanding Drum Kit rides on a 1/4-inch shank and covers the common small-to-medium drum sizes. It is the “just get me sanding” choice, and it fits any standard keyed chuck.
- If you would rather buy once and have grits and spare sleeves on hand for a long time, the Sunxeke 187-Piece Sanding Drum Kit piles on sleeves in 60, 80, 120, and 240 grit across several rubber drums, all on a 1/4-inch shank. The sheer sleeve count is the point here, because sleeves are the consumable that runs out.
- If your work is mostly larger curves and you want a taller drum so you can sand deeper edges in one pass, look at the O’Skool 2 inch by 3 inch Sanding Drum Kit. The extra drum height genuinely helps on thicker stock and lets you shift the contact band as the abrasive wears.
My pick for most people is the Sunxeke kit. Not because more pieces is automatically better, but because sanding sleeves are consumables, and having a deep bench of replacements in multiple grits means you actually change to a fresh sleeve instead of grinding away on a dull one and burning your work. The DCT kit is the smarter buy if you only sand occasionally and hate clutter. The O’Skool taller drums are the specialist choice when your edges are thick.
Verdict
A drill press spindle sander is one of the best value moves in a small shop. Add a good drum kit, build a five-minute auxiliary top with a clearance hole, run a moderate speed, and keep the work moving. You will smooth curves and inside profiles cleanly without buying, powering, or finding floor space for another machine. Just respect the one real limitation, the lack of oscillation, by not dwelling in one spot, and you will be genuinely happy with what this setup does.
Buy the Sunxeke kit if you want to sand for years without reordering sleeves constantly. Buy the DCT kit if you want the simplest possible start. Reach for the O’Skool taller drums when your edges are thick enough to need them.
FAQ
Can any drill press be used as a spindle sander? Almost any one with a keyed chuck can. You just need the chuck to grip a 1/4-inch shank, which nearly all of them do. The bigger question is comfort: more spindle travel and moderate speed control make the experience much better, but even a basic benchtop machine works with a good auxiliary top.
Why does my sanded edge get burn marks? Two usual causes. You are dwelling in one spot without moving the work, or your machine speed is too high. Because a drill press does not oscillate, the same band of abrasive keeps hitting the wood. Keep the piece moving, drop the speed to a mid setting, and reposition the drum height so you present fresh sleeve.
Do I need to remove my drill press vise or fence? Yes, clear the table. For sanding you want an open, fully supported flat surface with a clearance hole for the drum, not a vise or clamp in the way. Build a simple plywood or MDF top for sanding and swap back for drilling.
How do I control dust? There is no built-in dust port under a drill press table, so position a shop vac nozzle right at the drum or clamp a small pickup to your auxiliary top. Sanding dust is fine and floats, so do not skip this.
Will continuous sanding hurt my drill press? The induction motor is designed for intermittent drilling, not long continuous runs, so give it rest on extended sessions. Occasional sanding will not hurt it. Just avoid marathon runs without letting it cool.
References
- DCT Drill Press Sanding Drum Kit: Check on Amazon
- Sunxeke 187-Piece Sanding Drum Kit: Check on Amazon
- O’Skool 2 inch by 3 inch Sanding Drum Kit: Check on Amazon


