
How to Replace the Belt on a Delta Shopmaster Drill Press: A Clear, Shop-Ready Method
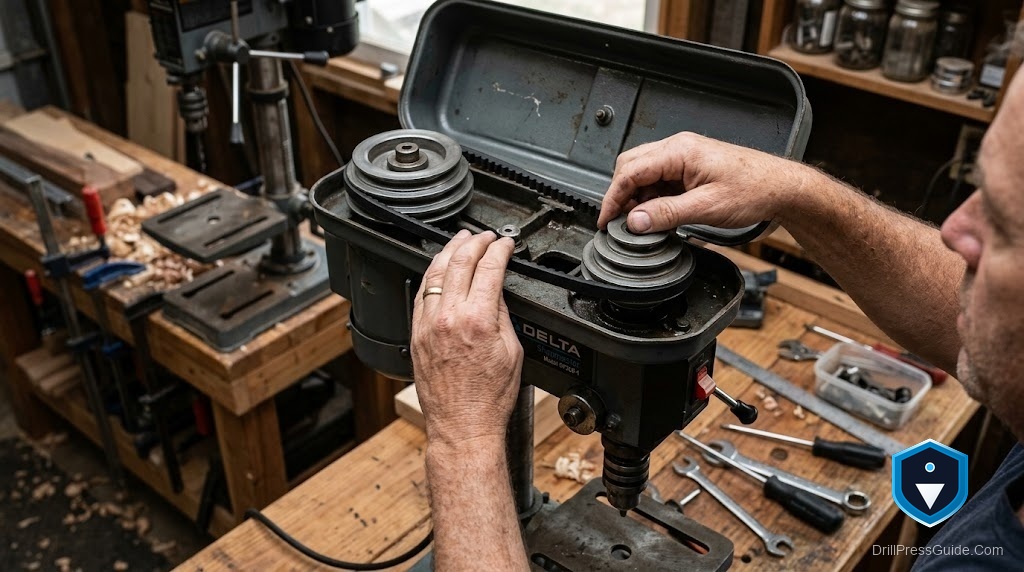
You flip the switch, the motor hums the way it always has, and the chuck barely turns. Or there’s a slap-slap-slap coming from under the belt cover and a faint smell of hot rubber. That is almost always a belt that has stretched, glazed, or cracked, and on a Delta Shopmaster it is a job you can finish in under an hour with hand tools. Knowing how to replace the belt on a Delta Shopmaster drill press really comes down to three things: reading the speed chart, releasing tension the right way, and matching the belt before you spend anything.
Replacing a drill press belt means loosening the motor so the V-belt goes slack, rolling the worn belt off the stepped pulleys, and seating a correctly sized replacement in the grooves that set your speed. Delta used the Shopmaster name on several benchtop and floor machines, and the widely owned 17-900 twelve-speed head is a common example. On that head the factory belt is listed under part number 1312030, and it is actually a set of two belts, not one.
Here is the short version. Unplug the press, open the belt cover, swing the belt tension lever (or slide the motor forward) to slacken the belts, roll the old belt off the pulleys by hand, drop the new belt into the pulley steps that match your target speed, then re-tension until the belt flexes about half an inch under firm thumb pressure. A 1/2 inch wrench and a little patience cover the whole job.
Find your exact model before you buy a belt
The badge says Shopmaster, but the belt inside depends on the model number, so read the label first. Look at the motor plate or the tag on the column for something like 17-900, and note the type number if there is one. The 17-900 shipped in USA, Taiwan, and China production runs over the years, and owners have found the pulley setups are not always identical between them.
On the 17-900 the 1312030 set uses two different lengths, commonly an A25.5 on the motor end and an A27 on the quill end. The shorter belt drives the motor-to-idler step and the longer one runs idler-to-spindle. If you only hear noise from one belt, replace both anyway. A fresh belt running against a stretched one wears unevenly, and you will be back inside the cover within a month.
Tools and the belt itself
You do not need much:
- A 1/2 inch wrench or socket for the motor mount bolts
- A flashlight
- A clean rag and a little degreaser for the pulley grooves
- The replacement belt
For a straight fix, this replacement belt set for the Delta 17-900 matches the 1312030 dimensions and drops onto the stock pulleys without modification. The honest drawback: it is an aftermarket rubber belt, not Delta-stamped, and a few owners of the early USA-built 17-900 have found their pulley spacing runs a hair different, so the belt sits slightly proud in the groove. If your press is an early USA unit, pull the old belt first and measure it before ordering. Anyone with a Taiwan or China era 17-900 (most of them) can order with confidence.
If you would rather not wait on shipping, an automotive V-belt of the same A-section profile and length works fine, and some woodworkers argue the auto belt is better made. The tradeoff is that you have to match the length exactly at the counter, and the parts-store belt will not carry Delta markings if you ever resell the machine.
Step by step: pulling the old belt
- Unplug the drill press. Not the switch, the plug. This is the one step nobody should skip.
- Open the belt cover on top of the head. On the 17-900 it lifts or swings up to expose the motor, idler, and spindle pulleys.
- Release tension. Swing the belt tension lever to move the motor toward the spindle, or loosen the two motor mount bolts and slide the motor forward. The belts should go loose enough to lift by hand.
- Note which grooves the belts sit in. Snap a photo with your phone so you can return to the same speed later.
- Roll each belt off the pulley. Turn the pulley by hand while easing the belt up over the lip. Never pry with a screwdriver, because a nicked pulley eats belts.
Step by step: fitting the new belt
- Wipe the pulley grooves clean. Old rubber dust and grease make a new belt slip and squeal.
- Set the new belt into the pulley steps that give your target speed. The chart under the cover pairs pulley positions with RPM. Lower steps on the motor and higher on the spindle mean slower speed and higher torque; the reverse means faster.
- Re-tension. Move the motor back with the lever, or slide it back and snug the bolts. Aim for about half an inch of deflection when you press the belt midway between two pulleys. Too tight and you cook the motor bearings; too loose and it slips and squeals.
- Spin the spindle by hand one full turn to confirm the belt tracks in the grooves.
- Close the cover, plug in, and run it for a minute. A little squeal on first start usually clears once the belt seats.
How a Delta belt change compares to a modern variable-speed press
This is worth knowing if you are tempted to upgrade instead of repair. The step-pulley system on the Shopmaster is the reason this fix is simple and doable at home: no electronics, just rubber and geometry. A modern mechanical variable-speed press like the WEN 4214 skips belt swaps entirely with a lever, which is genuinely nicer day to day, but when its speed mechanism fails the repair is not a ten-minute belt roll. For a press you already own and trust, replacing the belt is the smarter move. Save the upgrade talk for when the motor or bearings finally go.
A belt is the fastest hour you’ll spend on this press
A slipping or slapping belt looks like a dying machine and almost never is one. On a Delta Shopmaster, three habits get it right: identify the 17-900 (or your exact model) before ordering, replace both belts in the 1312030 set together, and set tension to that half-inch flex instead of cranking it drum-tight. Do that and the press runs quieter than it has in years.
Three things to carry away:
- Match the belt to the model, not the badge. Measure the old one if your press is an early USA build.
- Clean the pulley grooves. A new belt on a dirty pulley squeals and slips just like the old one.
- Tension by feel, about half an inch of deflection, and re-check after the first hour of use.
FAQ
What size belt does a Delta 17-900 drill press use? The factory set is Delta part 1312030, two belts, commonly an A25.5 on the motor end and an A27 on the quill-to-spindle end. Measure your old belts if the machine has been modified.
Can I use a car V-belt on my drill press? Yes, if you match the A-section profile and the length. Take the old belt to an auto parts store and match it exactly. Automotive belts are often well made, but they will not carry Delta markings.
Why does my new drill press belt squeal? Usually dirty pulley grooves or a belt set too loose. Clean the grooves, then re-tension to about half an inch of deflection. A brief squeal on first startup that clears on its own is normal.
Do I have to replace both belts at once? On a two-belt head like the 17-900, yes. A new belt paired with a stretched old one wears unevenly and fails early.
How tight should a drill press belt be? About half an inch of give when you press it midway between two pulleys. Drum-tight belts overload the motor bearings; loose belts slip and glaze.
Where is the model number on a Delta Shopmaster drill press? Check the motor nameplate and the label on the column or head casting. Look for a number such as 17-900, plus a type number that tells you the production run.
My chuck spins slowly even with a new belt. What now? Confirm the belt sits in the correct pulley steps for your speed, then check that the motor mount is tight and tracking straight. If the motor itself lacks power, the problem is the motor or a failing start capacitor, not the belt.
References
- Delta 17-900 (Type 1) Drill Press parts and repair help, Fix.com: https://www.fix.com/models/drill-press/delta/id742692/17-900-type%201/


