
Replace Drill Press Chuck: The Checks That Prevent a Bad Repair
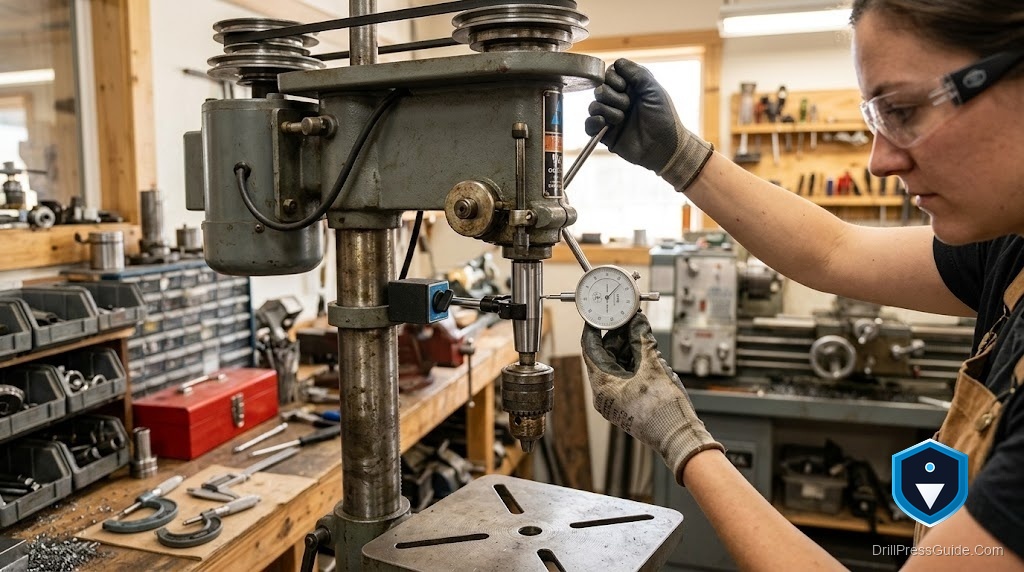
Most failed drill press chuck replacements fail for the same small set of reasons: the wrong taper size, an arbor and chuck body that do not match each other, a bore that was not cleaned before installation, or a taper that was not fully seated. None of these are complicated problems; they are all checks that take a minute before starting and prevent an hour of troubleshooting afterward. This guide focuses on those checks — what to verify before you remove the old chuck, what to inspect before you install the new one, and how to confirm the job is done correctly.
Straight answer: the checks that matter are (1) taper type confirmed before buying, (2) chuck and arbor verified as matched, (3) bore clean and dry before installation, and (4) runout measured after seating. Run all four and a chuck replacement goes right the first time.
Check 1: Confirm the taper type before buying
The spindle taper determines which arbor fits. Two types cover the majority of consumer and light industrial drill presses:
- JT33 (Jacobs Taper #33): Standard on most benchtop presses. The arbor presses directly into the JT33 spindle bore.
- MT2 (Morse Taper #2): Standard on many floor presses and some benchtop models. The arbor inserts into the MT2 quill bore and is retained with a draw bar.
Do not guess. Check the machine’s manual or the markings on the existing chuck or arbor. If you cannot find markings, measure the arbor’s small-end diameter and compare to published taper standards.
What goes wrong when this check is skipped: Buying a JT33 arbor for an MT2 spindle (or vice versa) means the new chuck simply does not fit. This is the most common sourcing error on this repair.
Check 2: Verify the chuck and arbor are a matched set
A chuck mounts on an arbor through its own taper bore. This taper is a Jacobs taper, but the Jacobs taper family has multiple sizes (JT0, JT1, JT2, JT3, JT6, JT33), and these are not interchangeable. A chuck with a JT33 bore requires an arbor with a JT33 male taper. A chuck with a JT6 bore requires a JT6 arbor.
The safest approach: buy a matched chuck-and-arbor combination packaged together. When the chuck and arbor are sold as a matched set, the taper interface is guaranteed correct. Mixing individually sourced chucks and arbors creates the risk of mismatched taper sizes that look similar but do not seat properly.
Recommended matched combinations:
- JT33 spindle, 5/8-inch keyed: Chuck with JT33 arbor
- JT33 spindle, 1/2-inch capacity: JT33 chuck, 1/32–1/2-inch
- MT2 spindle: MT2-to-JT33 arbor with draw bar plus a JT33 chuck
- Full kit: HAowosi 1/2-inch chuck kit with arbors
Check 3: Clean and dry the bore before installation
A taper joint holds by friction between two precision-machined surfaces in full contact. Anything between those surfaces — chips, oil, grease, corrosion — reduces or eliminates contact and degrades grip.
After removing the old chuck, wipe the spindle bore with a clean dry rag. Inspect for:
- Chips or grit: Wipe and re-inspect.
- Burrs or raised nicks: Remove with a fine file or 400-grit emery cloth; clean again.
- Oil or grease: If someone previously lubricated the taper, degrease the bore with a clean cloth dampened with isopropyl alcohol, then dry completely.
Apply no lubricant to the new arbor or chuck before installation. Dry surfaces only.
Check 4: Measure runout after seating
A chuck that feels solid and shows no wobble by hand can still have measurable runout that affects hole accuracy. The check:
- Chuck a precision ground rod or a known-straight drill bit shank at least 3 inches long.
- With a dial indicator mounted to the table, touch the indicator tip to the rod at 2 inches from the chuck jaws.
- Rotate the spindle by hand through one revolution; read the TIR (total indicated runout) from the indicator.
- Under 0.005 inches TIR is acceptable for most shop work. Under 0.002 inches for precision drilling.
If runout is excessive, remove the chuck, re-inspect the bore and arbor, and reseat. High runout after reseating on clean surfaces indicates a damaged bore or a bent arbor — investigate before drilling.
The honest reality
The checks in this guide add about five minutes to the job. Skipping them adds an hour of troubleshooting (or a second trip to buy the correct arbor). The most expensive outcome is seating a mismatched arbor and damaging the spindle bore on removal — a problem that then requires machining to fix.
Conclusion: four checks, one successful replacement
A replaced drill press chuck runs true if the four checks are completed.
- Confirm taper type (JT33 or MT2) from the manual or existing arbor markings.
- Buy a matched chuck-and-arbor combination.
- Clean and dry the bore before installation; no lubricant.
- Measure runout after seating; accept under 0.005 inches TIR for general work.
FAQ
What is the most common chuck replacement mistake? Buying the wrong arbor taper — either the wrong spindle taper type (JT33 vs MT2) or a mismatched Jacobs taper between the chuck bore and the arbor.
Why no oil on the taper? Taper joints are dry-friction joints. Oil prevents the self-holding grip and allows the chuck to walk or release during use.
How do I remove a chuck that has been over-tightened or corroded in place? Use the drift key method. A stuck taper may require more decisive mallet blows; penetrating oil applied to the junction and allowed to soak for a few hours can help on severely corroded tapers.
What is TIR? Total Indicated Runout — the total variation measured by a dial indicator over one full revolution. The smaller the TIR, the more accurately the chuck runs on the spindle’s true axis.
Can I reuse the old arbor? Yes, if it is undamaged and the chuck bore taper matches. Inspect the arbor’s taper surface for nicks, scoring, and corrosion before reusing.
What if the spindle bore itself is damaged? A damaged bore (nicks, deep scoring) prevents proper taper seating and requires machining repair. This is beyond a DIY replacement and typically requires a machine shop.
References
- Jacobs Taper sizes and arbor compatibility: https://www.jacobs-chuck.com
- Morse Taper reference: https://www.mscdirect.com
- VintageMachinery.org, drill press chuck general reference: https://www.vintagemachinery.org


