
Spindle Sander Attachment for Drill Press: What It Does and How to Set It Up
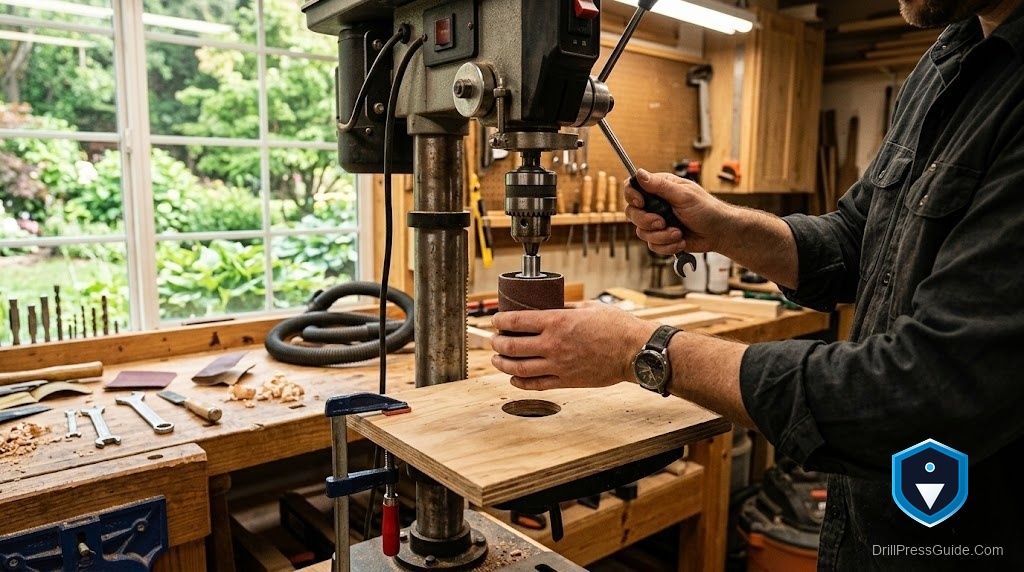
A spindle sander attachment is one of the genuinely satisfying drill press add-ons: chuck a sanding drum, drop it through a hole in the table, and suddenly your press smooths curves and fairs edges that a flat sander cannot reach. It is a real, useful capability, not a compromise, as long as you understand what the attachment includes, how it mounts, and the one limitation a drill press brings to the job. Set it up right and you get clean, sanded curves; set it up carelessly and you burn the work or load the bearings wrong.
A spindle sander attachment for a drill press pairs a sanding drum, chucked in the spindle, with an insert or table that surrounds the drum so you can sand the edges of curved or contoured work. It adds contour and edge sanding to a machine you own, using the press’s vertical spindle to spin the drum.
Short answer: a spindle sander attachment lets your drill press sand curves and edges by spinning a sanding drum through a table opening. Chuck the drum, support the work on the table around it, and feed the work against the drum’s rotation for clean, controlled sanding.
What the attachment includes
A typical setup has two parts: the sanding drum, a rubber core with a replaceable abrasive sleeve that chucks into the spindle, and a table or insert with an opening that surrounds the drum so the work is supported right up to the sanding surface. Some kits include several drum diameters for different curves and inserts sized to each. The drum spins with the spindle; the surrounding table keeps the work flat and supported while you sand its edge.
The one limitation to respect
A drill press spins the drum, but it is not a dedicated oscillating spindle sander. A dedicated machine moves the drum up and down as it spins, spreading wear along the abrasive and reducing burning. A drill press drum only spins, so the same band of abrasive does all the work, which loads and heats faster. You can offset this by raising or lowering the table slightly between passes to use more of the sleeve, and by keeping the work moving so you do not dwell in one spot and scorch it.
Check before you buy
- Drum and chuck. Confirm the drum’s shank fits your chuck.
- Table opening. You need an insert or table opening around the drum to support the work.
- Sleeve sizes. Match drum diameters and grits to your curves and finish.
- Speed. Set a sanding-appropriate speed per the attachment’s guidance.
Drill press drum versus a dedicated oscillating sander
Against a dedicated oscillating spindle sander, a drill press drum attachment wins on using a machine you own and on simplicity, and loses on oscillation, which spreads wear and reduces burning, and on a purpose-built table. For occasional curved-edge sanding, the attachment is excellent value; for constant contour sanding, a dedicated oscillating sander lasts longer and burns less. You can compare a drill press sanding drum kit with a spindle sander table insert.
Setting it up
- Chuck the sanding drum securely and confirm it runs true.
- Fit a table or insert with an opening around the drum so the work is supported.
- Set a sanding-appropriate speed per the attachment’s guidance.
- Feed the work against the drum’s rotation, keeping it moving to avoid burning.
- Raise or lower the table between passes to spread sleeve wear; wear eye protection and keep clear of the chuck, per OSHA and CCOHS.
Who should read this
If you sand curves and contoured edges occasionally and already own a drill press, a spindle sander attachment adds that capability cheaply and well, just keep the work moving. If you sand contours constantly, a dedicated oscillating spindle sander is worth having for its oscillation and durability.
Bottom line
A spindle sander attachment turns a drill press into a capable contour sander: a drum in the spindle and a supporting table let you smooth curves and edges cleanly. Its one limitation is no oscillation, so spread the wear by adjusting the table and keep the work moving to avoid burning. Within that, it is one of the most useful and satisfying attachments you can add.
- A drum in the spindle plus a supporting table lets a drill press sand curves and edges.
- With no oscillation, spread sleeve wear by adjusting the table and keep the work moving.
- Feed the work against the drum’s rotation for clean, controlled sanding.
FAQ
How does a spindle sander attachment work on a drill press? A sanding drum chucks into the spindle and spins; a table or insert around the drum supports the work while you sand its edge.
Is it as good as a dedicated oscillating sander? For occasional work, yes and cheaper. A dedicated sander oscillates, which spreads wear and reduces burning for constant contour sanding.
Why does my drum burn the work? Without oscillation, one band of abrasive does all the work and heats up. Keep the work moving and adjust the table to use more of the sleeve.
Do I need a special table? You need an insert or table with an opening around the drum so the work is supported right up to the sanding surface.
What speed should I use? A sanding-appropriate speed per the attachment’s guidance, generally moderate, so the abrasive cuts without scorching the work.
Can I use different drum sizes? Yes. Match drum diameters to your curves and keep inserts sized to each drum so the work stays supported.
References
- OSHA Woodworking eTool, Drill Press: https://www.osha.gov/etools/woodworking/production/machines-tools/drill-press
- CCOHS, Metalworking Machines - Drill Presses: https://www.ccohs.ca/oshanswers/safety_haz/metalworking/drillpresses.html
- WEN Drill Press FAQs: https://wenproducts.com/pages/drill-press-faqs


