
Drill Press Woodworking Projects: The Setup Details That Change the Result
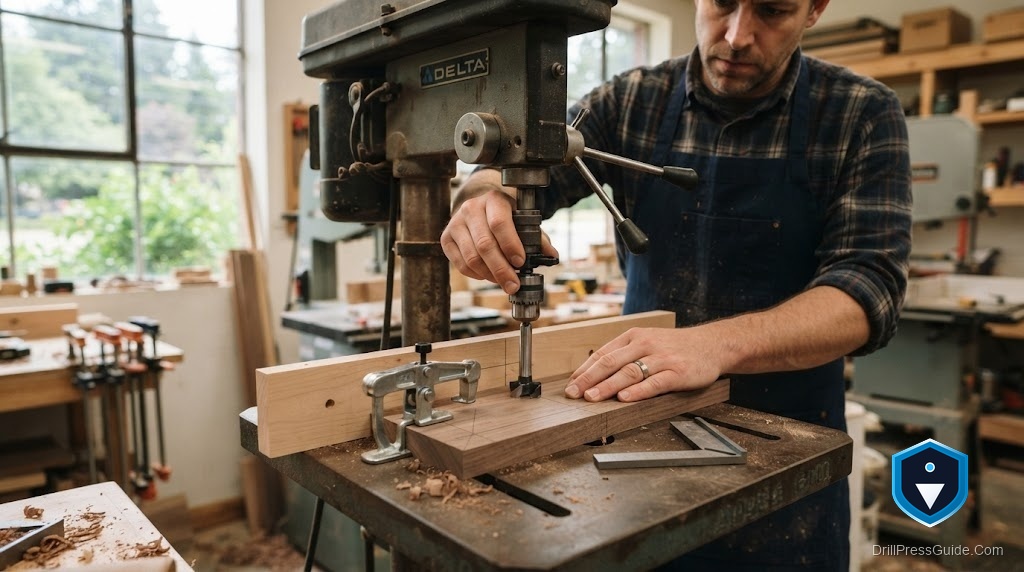
Two woodworkers build the same tea-light holder. One comes out with clean, identical recesses and dowels that seat flush; the other has scorched holes and a wobbly joint. Same project, same bits, often the same press. The difference is setup: how the table is arranged, how the work is held, how the speed is matched to the bit. Drill press woodworking projects live or die on those details far more than on which press you own.
Drill press woodworking projects are builds that depend on the press for clean, accurate holes, and their success comes from setup: an auxiliary table and fence, correct speed for the bit, backing to prevent blowout, and firm workholding.
The short answer: get the setup right and almost any project succeeds. Add an auxiliary table with a fence and stop, match the speed to the bit (slow for large bits), back up every through-hole, and clamp the work. The project list matters less than these habits.
The table setup decides repeatability
Most project failures trace to the stock table, which is small, open in the center, and has nothing to register against. An auxiliary wood table with a fence fixes it: a flat sacrificial surface backs the exit, a fence sets consistent edge distance, and a stop block fixes hole position. Now a row of shelf-pin holes or a set of matching dowel holes comes out identical.
This is the setup detail that changes the most projects at once. Whether you build the table or buy one, do it before tackling anything that needs more than a single hole.
Match speed to the bit, every time
The second detail is speed, and it is where scorched recesses come from. Small brad-point and twist bits want high RPM near 3000; large Forstner bits want low speed, down near 250 to 500, or they burn. Set the speed to the bit in front of you, not once for the whole session.
Good bits make this forgiving. A Forstner bit set with carbide tips cuts the clean, flat-bottomed holes projects like coasters and candle holders need, and a sharp bit tolerates a small speed error that a dull one turns into a scorch mark. Slow down and peck for the large sizes and the recesses come out clean.
Backing and depth control
The third detail is the exit. A through-hole blows out a ragged crater on the underside unless a sacrificial backer board supports the fibers, so the bit exits into wood, not air. For projects with many identical parts, set the press’s depth stop once so every recess or counterbore is the same depth. These two habits, backing and depth stops, turn a rough build into a clean one.
They cost nothing and take seconds. Skipping them is the most common reason a project looks homemade in the bad sense.
Workholding for clean, safe results
The fourth detail is holding the work. Wood spins when a large bit grabs, ruining the hole and risking your hand, so clamp the piece, use the fence with a stop, or cradle round stock in a V-block. A quick hold-down on the auxiliary table makes this effortless and keeps hands clear of the chuck.
Eye protection is essential, and a dust mask matters once sanding drums enter the picture. These are setup details too, the ones that keep the project from becoming an injury.
The verdict
Drill press woodworking projects succeed on setup, not on the machine’s price. An auxiliary table with a fence, speed matched to each bit, a backer board, and firm workholding will make a basic press turn out clean, repeatable, professional results. Dial those in once and you stop blaming the tool for scorched holes and blowout. Build or buy the table and fence first, because every project downstream gets easier the moment the press can register and back up a workpiece.
Carry these forward:
- An auxiliary table with a fence and stop is the setup that helps most projects.
- Match speed to the bit each time; slow for large Forstner bits.
- Always back up through-holes and set a depth stop for identical parts.
- Clamp or fence the work; a spinning part ruins the piece and risks your hand.
Frequently asked questions
What setup do I need for drill press woodworking projects? An auxiliary table with a fence and stop, the correct speed for each bit, a sacrificial backer board, and firm workholding. These matter more than the press model.
Why do my project holes come out scorched? Too much speed for the bit. Large Forstner bits need a slow spindle and chip-clearing pecks, especially in hardwoods.
How do I get identical parts in a project? Use a fence and stop block for position and set the press’s depth stop for consistent depth. Then every part matches without remeasuring.
How do I stop blowout on the back of a hole? Clamp a sacrificial backer board under the workpiece so the bit exits into wood rather than open air.
Do I need to clamp small project parts? Yes. Wood spins when a bit grabs, especially large bits, ruining the hole and risking your hand. Use a clamp, fence, or V-block.
What is the single best upgrade for project work? An auxiliary table with a fence. It enables backing and repeatable holes, which are the foundation of almost every project.
References
- Fine Woodworking, Drill Press Speed Chart: https://images.finewoodworking.com/app/uploads/2020/01/22111726/drill-bit-speed-chart.pdf
- WOOD Magazine, Wise Buys: Drill-Press Tables: https://www.woodmagazine.com/woodworking-tools/reviews/drill/drill-press-tables


