
DIY Mortising Attachment for Drill Press: A Practical Workshop Build Guide
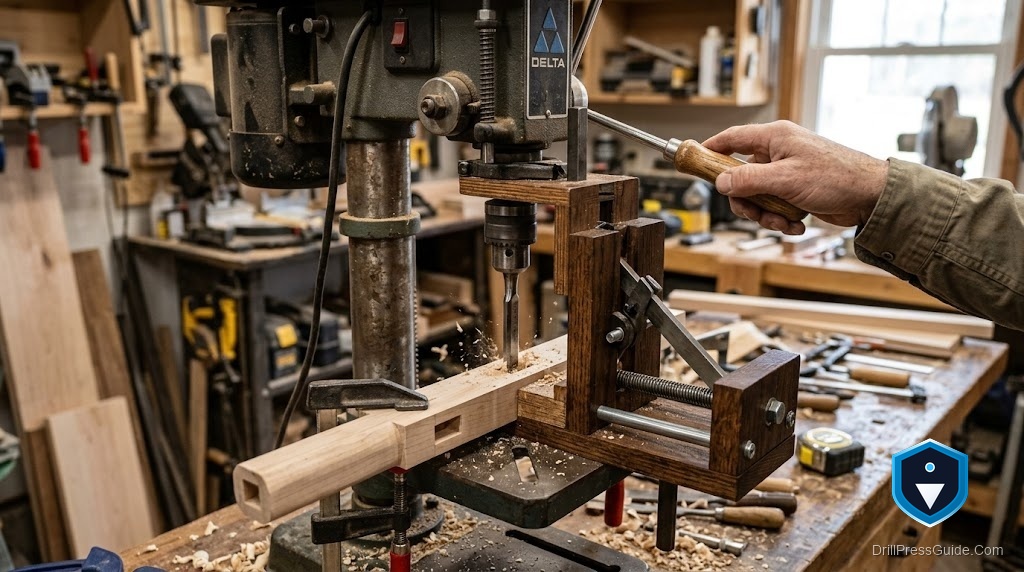
Cutting square mortises for joinery by hand is slow, and a drill press can speed it up a lot, either by removing most of the waste with a bit or, with a mortising attachment, cutting genuinely square holes using a hollow chisel and auger. A shop-built mortising setup for a drill press is a rewarding project that turns the machine into a joinery tool, but it has to hold the work square, guide it accurately, and, if you use hollow chisels, keep the chisel aligned. Here is a practical guide to building one that actually cuts clean mortises.
A DIY mortising attachment for a drill press adapts the machine to cut mortises, either by holding a hollow mortising chisel and auger so the drill press cuts square holes, or by adding a fence and clamps so a regular bit can bore out mortise waste accurately. Building one means a way to hold and align the chisel or bit, a fence to reference the work, and a hold-down or clamp so the workpiece stays put and square.
Short answer: build a fence and hold-down that position the workpiece square and let you index it along the mortise, plus, for true square mortises, a holder that grips a hollow mortising chisel aligned to the bit. Accuracy and safety come from holding the work square and clamped and keeping the chisel or bit aligned, so the attachment is really about registration and alignment.
Decide your approach first
Start by choosing which kind of mortising you will do, because it shapes the build. The simpler approach uses a regular drill bit to bore a row of overlapping holes to remove most of the mortise waste, then cleans the walls square with a chisel by hand, so the attachment just needs a fence and hold-down to position and index the work. The more capable approach uses a hollow square mortising chisel with an auger inside, which cuts a genuinely square hole, but this needs a holder to grip and align the chisel and enough spindle travel and rigidity to drive it. Deciding up front which method suits your work and machine keeps the build focused and matched to what you actually need.
Build the fence and hold-down
Both approaches need a fence and hold-down, so build these well. The fence references the back face of the workpiece and sets the mortise’s distance from that face, so make it straight, stable, and lockable square to the bit, mounted to the drill press table or a shop-built table. The hold-down keeps the workpiece pressed down and against the fence so it cannot lift or shift as the bit or chisel withdraws, which is both an accuracy and a safety essential, since mortising can grab and lift the work. Add stops so you can index the piece along the mortise in even steps. A solid fence, a firm hold-down, and indexing stops are what let you cut a straight, correctly placed mortise repeatably.
For hollow chisels, align and mount carefully
If you use hollow mortising chisels, the attachment must hold the chisel body square and aligned so the auger runs concentric inside it and the square chisel faces line up with the fence. Build or fit a holder that clamps the chisel bushing solidly to the quill or head, with the chisel set at the right depth relative to the auger, a small gap so the auger clears chips, per the chisel maker’s guidance. The chisel faces must be square to the fence so the holes align into a clean mortise. Because hollow chisels need force to drive and generate heat, ensure your machine has the rigidity and travel for it, and keep the chisel sharp. Careful alignment and a solid mount are what make hollow-chisel mortising cut clean, square holes.
Set it up, cut, and stay safe
Once built, set the fence for the mortise position, set the depth stop for the mortise depth, and clamp or hold the work firmly against the fence under the hold-down. Cut a test mortise in scrap and check its position, width, and depth before real work. Overlap the cuts evenly using the stops so the mortise walls come out straight. Clear chips, keep the bit or chisel sharp, feed steadily without forcing, and keep hands clear of the cutter. For hollow chisels especially, do not force a dull or misaligned chisel, since that causes heat, burning, and wander. Set up and used this way, the attachment turns the drill press into a reliable mortising tool for solid joinery.
Conclusion
A DIY mortising attachment for a drill press is a genuinely useful build that speeds up joinery, whether you bore out waste with a regular bit or cut true square holes with a hollow chisel. Decide your approach first, then build a straight, lockable fence, a firm hold-down, and indexing stops so the work stays square and clamped and you can index it accurately. For hollow chisels, add a holder that keeps the chisel square and aligned to the auger, and make sure your machine has the rigidity for it. Set the fence and depth, test in scrap, cut steadily, and stay clear of the cutter. Built this way, the drill press cuts clean, accurately placed mortises for strong, tidy joints.
Frequently asked questions
Can a drill press cut mortises? Yes. It can bore out most of a mortise’s waste with a regular bit for you to clean up by hand, or, with a hollow square chisel and auger attachment, cut genuinely square holes directly.
What does a mortising attachment need? A straight fence to reference the work, a firm hold-down and clamp so the piece stays square and cannot lift, indexing stops, and, for hollow chisels, a holder that keeps the chisel aligned to the auger.
Why is the hold-down important? Because mortising can grab and lift the workpiece as the bit or chisel withdraws. A firm hold-down keeps the piece down and against the fence, which protects both accuracy and safety.
How do hollow mortising chisels work? A square hollow chisel surrounds an auger that clears the waste while the chisel’s four faces cut the hole square. The chisel must be held square, aligned to the fence, and set at the right depth over the auger.
Does my drill press need anything special for hollow chisels? Enough rigidity and spindle travel to drive the chisel, which takes real force, and a way to mount the chisel holder solidly. Keep the chisel sharp, since a dull one causes heat, burning, and wander.
How do I get straight mortise walls? Use indexing stops to overlap the cuts evenly along the mortise, keep the work firmly against the fence, and test in scrap first to check position, width, and depth before cutting real parts.
References
- Forest Products Laboratory, wood joinery and machining references, fpl.fs.usda.gov
- OSHA, Machine Guarding eTool: Drill Presses, osha.gov


