
Benchtop Drill Press Table Plans: A Practical Workshop Build Guide
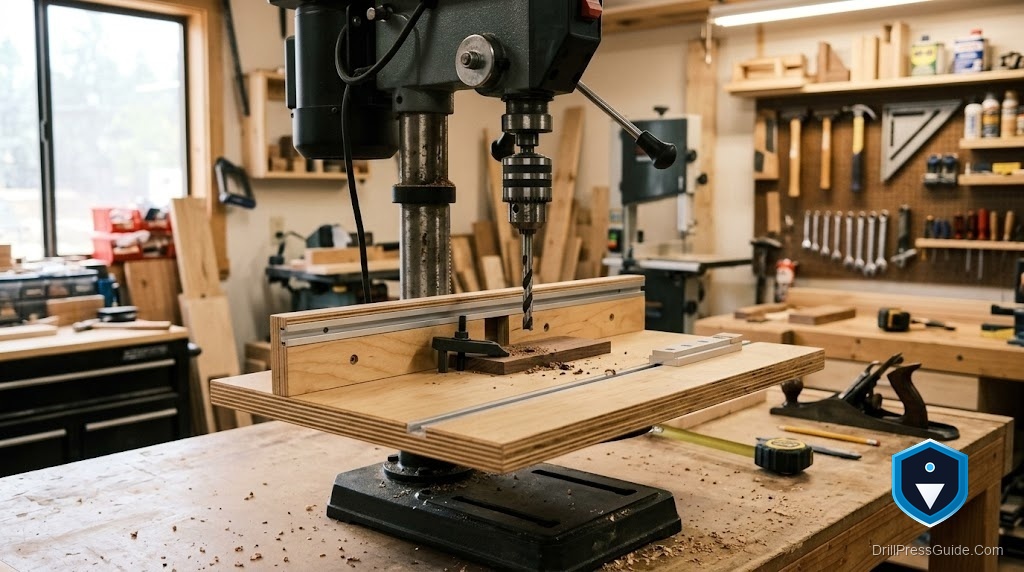
The little cast-iron table that comes on a benchtop drill press is fine for metalwork and nearly useless for woodworking: too small to support a board, with a hole in the middle that swallows small parts and lets edges tear out. A shop-built table fixes all of that, and a benchtop machine especially benefits because its modest table is its biggest limitation. Good plans do not just tell you what to cut; they explain why each element is shaped the way it is, so you can size the table to your own machine and work.
Benchtop drill press table plans are a set of dimensions, materials, and steps for building a wooden work surface that mounts on a benchtop drill press’s factory table, adding a larger flat area, an adjustable fence, and a replaceable insert. Good plans cover the flat top, the mounting method, the fence and its track, the insert, and how to square everything to the spindle.
Short answer: solid plans build a flat two-layer top sized to your machine, mount it securely to the factory table, add a straight fence that locks square and clears the chuck, and fit a replaceable insert under the spindle. Because a benchtop press has limited height and a small factory table, the plans should keep the table from stealing too much drilling height while giving a genuinely useful work surface.
What good plans include
Before cutting, understand the elements any solid plan specifies, because that lets you adapt rather than follow blindly. A good plan gives a flat, stable top of laminated MDF or plywood, sized to support your work without hitting the column. It specifies a mounting method that bolts the top to the factory table’s holes or slots. It includes an adjustable fence, usually riding in a T-track, that locks square to the spindle and clears the chuck. It provides a replaceable insert under the bit. And it addresses squaring the finished table to the spindle. Plans that explain the purpose of each element, not just its size, let you fit the design to your specific benchtop machine and how you drill.
Sizing it for a benchtop machine
A benchtop press has less distance between chuck and table than a floor model, so a thick added table steals drilling height you may need. Good plans keep the top reasonably thin but still flat and stiff, typically two laminated layers, to balance rigidity against lost height. Size the top big enough to support your usual work but not so large it overhangs unwieldily, blocks the column, or makes a bench-mounted machine awkward. Consider your most common workpieces and set the dimensions from those. This sizing judgment, enough surface and rigidity without robbing too much height or crowding the machine, is exactly where benchtop plans differ from floor-model ones, and where following your own numbers beats copying a plan wholesale.
Building from the plans, in order
Work in the order good plans specify, because each step depends on the last. Laminate and trim a flat, square top first, since its flatness sets the table’s accuracy and cannot be fixed later. Mount it to the factory table by bolting through the existing holes or slots into inserts or captured nuts in the top, countersinking fasteners flush, never relying on friction. Add the fence with its T-track, checking it locks square and clears the chuck and column through the drill’s full travel. Cut an opening under the spindle and fit a snug, flush replaceable insert to back up the work and prevent tearout. Following this sequence keeps the build straightforward and the result accurate.
Squaring and finishing
With the table built and mounted, square it to the spindle: check the surface is perpendicular to the bit with a reliable square, adjust the mounting or shim as needed, and confirm with a test hole in scrap. Set the fence square and verify it too. If the plans include a T-track for stops and hold-downs or a dust port, fit those now that the core table is true. Because a benchtop machine gets bolted to a bench, make sure the whole assembly, machine and table, remains stable and does not overhang awkwardly. A few minutes squaring at the end is what turns a well-built table into an accurate one that earns its place on the machine.
Conclusion
Benchtop drill press table plans are worth following when they explain the why behind each element, so you can size the table to your own machine rather than copy blindly. Build a flat laminated top first, keep it thin enough not to steal too much of a benchtop machine’s limited drilling height, mount it solidly to the factory table, add a fence that locks square and clears the chuck, and fit a replaceable insert. Then square the whole thing to the spindle and confirm with a test hole. Done in order, the plans convert the small, awkward factory table into a precise, versatile surface, easily the best early upgrade a benchtop drill press can get.
Frequently asked questions
What should good benchtop drill press table plans include? A flat laminated top sized to your machine, a secure mounting method to the factory table, an adjustable fence in a T-track that locks square, a replaceable insert, and steps for squaring it to the spindle.
Why size the table differently for a benchtop press? Because a benchtop machine has less distance between chuck and table, a thick table steals drilling height. Plans should keep the top thin but flat and stiff, and not so large it crowds the machine.
What material should the top be? Two laminated layers of MDF or plywood, glued flat, for a stiff panel that resists warping. Flatness is critical, since it sets the table’s accuracy and cannot be corrected later.
How do I mount the table to a benchtop drill press? Bolt through the factory table’s existing holes or slots into inserts or captured nuts in the top, countersinking fasteners flush. Do not rely on friction, since a shifting top ruins accuracy.
In what order should I build it? Flat top first, then mount it to the factory table, then add the fence and T-track, then cut and fit the insert, and finally square the whole table to the spindle and test it.
How do I square the finished table? Check the surface is perpendicular to the bit with a reliable square, adjust the mounting or shim as needed, confirm with a test hole in scrap, and square the fence too.
References
- Forest Products Laboratory, wood machining and construction references, fpl.fs.usda.gov
- OSHA, Machine Guarding eTool: Drill Presses, osha.gov


