
How to Build a Drill Press Jig: Setup, Checks, and Common Mistakes
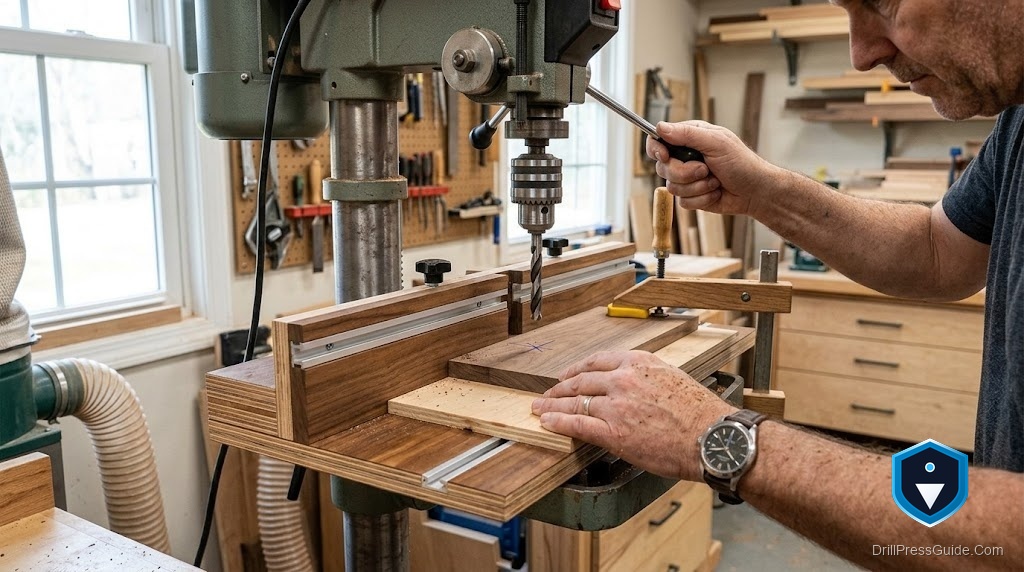
A drill press is accurate straight down, but the moment you need the same hole in twenty parts, or a row of evenly spaced holes, or a hole at a repeatable distance from an edge, doing it by eye gets slow and inconsistent. That is what a jig is for. A well-built drill press jig captures a setup once and repeats it perfectly, turning careful one-off work into fast, identical results. Building one is simple in principle, but a few checks and a few avoidable mistakes decide whether it actually holds accuracy.
A drill press jig is a shop-built fixture that positions a workpiece the same way for every hole, using stops, fences, and clamps so holes land in consistent, repeatable locations. Building one means fixing the workpiece position relative to the bit with a fence and stop blocks, so each part is drilled identically without measuring and marking every time.
Short answer: build the jig around a fence that references the bit, add stop blocks to fix the hole position along that fence, include a way to clamp or hold the workpiece firmly, and make the whole thing register the same way on the drill press table every time. The accuracy comes from repeatable positioning, so the jig must locate the work identically for every hole.
Start with what you are repeating
Before building, define exactly what the jig must repeat, because that shapes everything. Is it the same hole in many identical parts, a row of evenly spaced holes in one part, or a hole a set distance from an edge? A jig for repeated identical parts needs a pocket or stops that locate each part the same way. A jig for evenly spaced holes needs an indexing stop that moves the part a fixed step between holes. A jig for edge-referenced holes needs a fence at the right distance. Knowing the job first prevents the common waste of building a jig that does not actually match the task in front of you.
Build around a fence and stops
Most drill press jigs are built on a base that sits on the table, with a fence to reference one edge of the work and stop blocks to fix the position along that fence. The fence sets how far the hole is from the referenced edge, and the stops set where along the length the hole falls. For evenly spaced holes, an indexing pin or a movable stop lets you advance the part a fixed distance for each hole. Build these elements from stable, straight stock and fasten them solidly, because any flex or shift in the fence or stops directly becomes a misplaced hole. Solid, accurately placed references are the heart of a working jig.
Make it register and clamp the same every time
Two things separate a jig that holds accuracy from one that drifts. First, the jig itself must locate on the drill press table the same way for every part, so clamp it to the table or fit it against the table’s edge or slots, never let it float. Second, the workpiece must be held in the jig identically each time, with a clamp, hold-down, or toggle that grips it firmly against the fence and stops. If either the jig or the work can shift, the holes wander. Building in solid registration and a repeatable clamp is what lets you load part after part and trust every hole to land in the same place.
Set it up, check it, and avoid the common mistakes
Once built, set the fence and stops to your target position and drill a test piece, then measure the hole before committing to a run, this single check catches setup errors cheaply. Confirm the jig is clamped to the table and does not move, and that the workpiece seats fully against the references. The common mistakes are letting the jig float on the table, using a fence or stop that flexes, not clamping the work, and skipping the test piece. Also guard the bit and keep hands clear of the drilling zone, since a jig should improve safety by keeping fingers away, not tempt you to hold parts by hand. Avoid those and the jig delivers identical holes all day.
Conclusion
Building a drill press jig is about capturing a setup so it repeats perfectly. Define what you are repeating first, then build around a fence that references the bit and stop blocks that fix the position, adding indexing for evenly spaced holes. Make the jig register on the table the same way every time and clamp the workpiece firmly against the references, because any shift becomes a misplaced hole. Set it, drill a test piece, and check before the run. Avoid a floating jig, flexing references, unclamped work, and skipped tests, and a simple shop-built jig turns slow, inconsistent drilling into fast, identical, repeatable results.
Frequently asked questions
What does a drill press jig do? It positions the workpiece the same way for every hole using a fence, stops, and clamps, so holes land in consistent, repeatable locations without measuring and marking each part.
What is the most important thing for accuracy? Repeatable positioning. The jig must locate on the table the same way every time, and the workpiece must seat identically against the fence and stops, or the holes will wander.
How do I make evenly spaced holes with a jig? Add an indexing pin or a movable stop that advances the part a fixed distance for each hole, so the spacing is set by the jig rather than measured every time.
Should the jig be clamped to the table? Yes. A jig that floats on the table shifts between parts and ruins accuracy. Clamp it to the table or register it against the table’s edge or slots so it cannot move.
How do I hold the workpiece in the jig? With a clamp, hold-down, or toggle that grips it firmly against the fence and stops. This keeps positioning consistent and keeps your hands out of the drilling zone.
How do I know the jig is set right? Drill a test piece and measure the hole before running real parts. This cheap check catches setup errors before you drill a whole batch wrong.
References
- Forest Products Laboratory, wood machining references, fpl.fs.usda.gov
- OSHA, Machine Guarding eTool: Drill Presses, osha.gov


