
Building a DIY Drill Press Table with Dust Collection That Stays Square and Useful
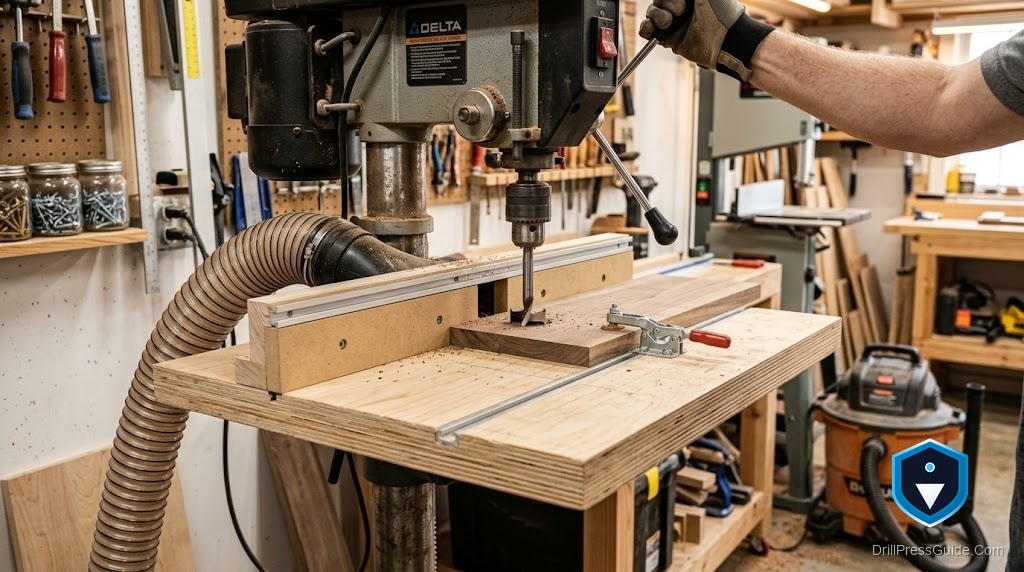
Drilling into wood makes a surprising amount of dust and chips, and on a bare drill press most of it piles on the table, packs into the hole, and drifts into the air you breathe. A shop-built table with dust collection fixes all three problems at once, and it is one of the most practical upgrades a drill press can get. The trick is adding real dust extraction without compromising the two things a drill press table must be: flat and square. This build keeps both goals in view.
A DIY drill press table with dust collection is a shop-built work surface that mounts on the factory table and adds a larger flat area, a fence, a replaceable insert, and a dust port that connects to a shop vacuum or dust collector to capture chips at the hole. Building one means making a flat top, integrating a dust pickup at the drilling point and often in the fence, and mounting it all square to the spindle.
Short answer: build a flat laminated top, add a fence with a dust port right behind the bit, fit a replaceable insert over a lower dust channel, and connect it to a vacuum, all while keeping the top flat and locked square to the spindle. The dust collection must be built in without warping the top or throwing it out of square, because accuracy still comes first.
Build the flat top first
As with any drill press table, start with a flat, stable top, because everything mounts to it and its flatness sets the table’s accuracy. Laminate two layers of MDF or good plywood with glue, clamped flat, into a stiff panel that resists warping, then trim it square to a size that supports your work without hitting the column. Plan the dust routing now, before assembly, since it is far easier to cut channels or recesses into the layers while you build than to retrofit them later. Getting a dead-flat top is non-negotiable; adding dust features must not compromise that flatness, so cut them cleanly and keep the working surface true.
Integrate dust collection at the source
Dust collection works best when it captures chips right where they are made, at the bit. Two pickups do this well together. First, a channel or cavity under a replaceable insert directly below the spindle lets a vacuum pull chips down through the insert opening as you drill. Second, a dust port built into the back of the fence catches what the bit throws backward, which is where much of the debris goes on through-holes and when drilling against the fence. Route both to a single port that connects to your shop vacuum or dust collector. Capturing at the source, rather than hoping to vacuum up afterward, is what makes the system genuinely effective.
Add the fence and replaceable insert
Build the fence from straight, stable stock, tall enough to support your work and hollow or channeled so it can carry the dust port along its length to the pickup behind the bit. Fit it to adjust and lock, commonly in a T-track, so it positions and then locks square to the spindle, and check it clears the chuck and column through its travel. Fit a snug, flush replaceable insert over the lower dust cavity under the spindle, so you can back up the work to prevent tearout and swap the insert when it wears. The fence and insert do double duty here, guiding the work and channeling the dust, so build them to serve both jobs.
Mount it, square it, and connect the vacuum
Mount the top securely to the factory table, bolting through its existing holes or slots into inserts in the top, never relying on friction, and countersink fasteners flush. Then square the table to the spindle with a reliable square, adjusting or shimming until the surface is perpendicular to the bit, and confirm with a test hole in scrap. Set the fence square too. Connect the dust port to your vacuum or collector with a hose and fitting sized to your equipment, and test the pickup while drilling to confirm it actually clears chips. A table that is flat, square, solidly mounted, and genuinely pulling dust is the goal, and testing the extraction under real drilling is what proves the build.
Conclusion
A DIY drill press table with dust collection solves the mess, the packed holes, and the airborne dust of drilling, all while giving you a bigger surface, a fence, and a replaceable insert. Build the flat laminated top first and plan the dust routing into it, then capture chips at the source with a pickup under the insert and a port in the fence, mount everything solidly, and square it to the spindle. Connect it to a vacuum and test the extraction under real drilling. Done this way, the dust collection never compromises the flatness and squareness that matter most, and you get a cleaner, healthier, more accurate machine.
Frequently asked questions
Where should the dust be captured on a drill press table? At the source, by the bit. A cavity under a replaceable insert pulls chips down through the insert opening, and a port in the fence catches what the bit throws backward.
Will adding dust collection make the table less accurate? Not if you build it right. Keep the top dead flat, cut dust channels cleanly into the layers, and square the finished table to the spindle. Accuracy still comes first; dust features must not warp or unsquare the top.
What do I connect the dust port to? A shop vacuum or a dust collector, using a hose and fitting sized to your equipment. Test the pickup while drilling to confirm it actually clears chips at the bit.
How do I route dust through the fence? Build the fence hollow or channeled so it carries a dust port along its length to a pickup right behind the bit, catching debris thrown backward during drilling.
Why use a replaceable insert over the dust cavity? It backs up the work to prevent tearout, opens to let the vacuum pull chips down, and can be swapped when it wears or fills with holes, keeping the drilling point clean.
Do I still need to square the table after mounting? Yes. After mounting, check the surface is perpendicular to the bit with a square, adjust or shim as needed, and confirm with a test hole. Square the fence too.
References
- Forest Products Laboratory, wood machining and dust references, fpl.fs.usda.gov
- OSHA, wood dust and machine guarding guidance, osha.gov


